LevelDB阅读笔记:读写流程
DB内部读写流程
上一节已经说过,class DB只是提供接口功能的抽象基类,leveldb通过DBImpl类来实现具体的接口功能:
// db_impl.h
class DBImpl : public DB {
  ...
};
出于简单考虑,本节只会分析读写流程,并且由于这部分涉及到很多其他组件的实现,我们并不能将所有实现细节完全讲出,而只能给出一个大概的执行过程。但这一部分毫无疑问是阅读其他代码组件的基础,正是从接口实现出发,我们可以沿着这一条主线前进,并且在遇到涉及其他组件的时候阅读其内部实现细节,从而建立对leveldb的整体认识。尽管这种方法不一定最好,但对于我这类初学者来说,应该是最容易想到和实施的方法了。
DBImpl的Put,Delete对原始的接口进行了override,如下所示:
class DBImpl : public DB {
  DBImpl(const Options& options, const std::string& dbname);

  DBImpl(const DBImpl&) = delete;
  DBImpl& operator=(const DBImpl&) = delete;

  ~DBImpl() override;

  Status Put(const WriteOptions&, const Slice& key,
             const Slice& value) override;
  Status Delete(const WriteOptions&, const Slice& key) override;
  Status Write(const WriteOptions& options, WriteBatch* updates) override;
  Status Get(const ReadOptions& options, const Slice& key,
             std::string* value) override;
	...
};
DBImpl写流程:Put与Delete
DBImpl的Put和Delete操作实际上经过了如下调用链:
// db_impl.cc
// Convenience methods
Status DBImpl::Put(const WriteOptions& o, const Slice& key, const Slice& val) {
  return DB::Put(o, key, val);
}

Status DBImpl::Delete(const WriteOptions& options, const Slice& key) {
  return DB::Delete(options, key);
}

// Default implementations of convenience methods that subclasses of DB
// can call if they wish
Status DB::Put(const WriteOptions& opt, const Slice& key, const Slice& value) {
  WriteBatch batch;
  batch.Put(key, value);
  return Write(opt, &batch);
}

Status DB::Delete(const WriteOptions& opt, const Slice& key) {
  WriteBatch batch;
  batch.Delete(key);
  return Write(opt, &batch);
}

Status DBImpl::Write(const WriteOptions& options, WriteBatch* updates);所以,实际上,DBImpl的Put和Delete都是调用的其基类部分实现,但其基类部分的实现实际上是将操作丢到WriteBatch里面,然后统一用Write来进行处理, (为什么不直接调用DBImpl::Write?为了省查虚表的开销?)所以分析的关键是Write操作。
整个Write操作可以用下面的这幅图来表示:
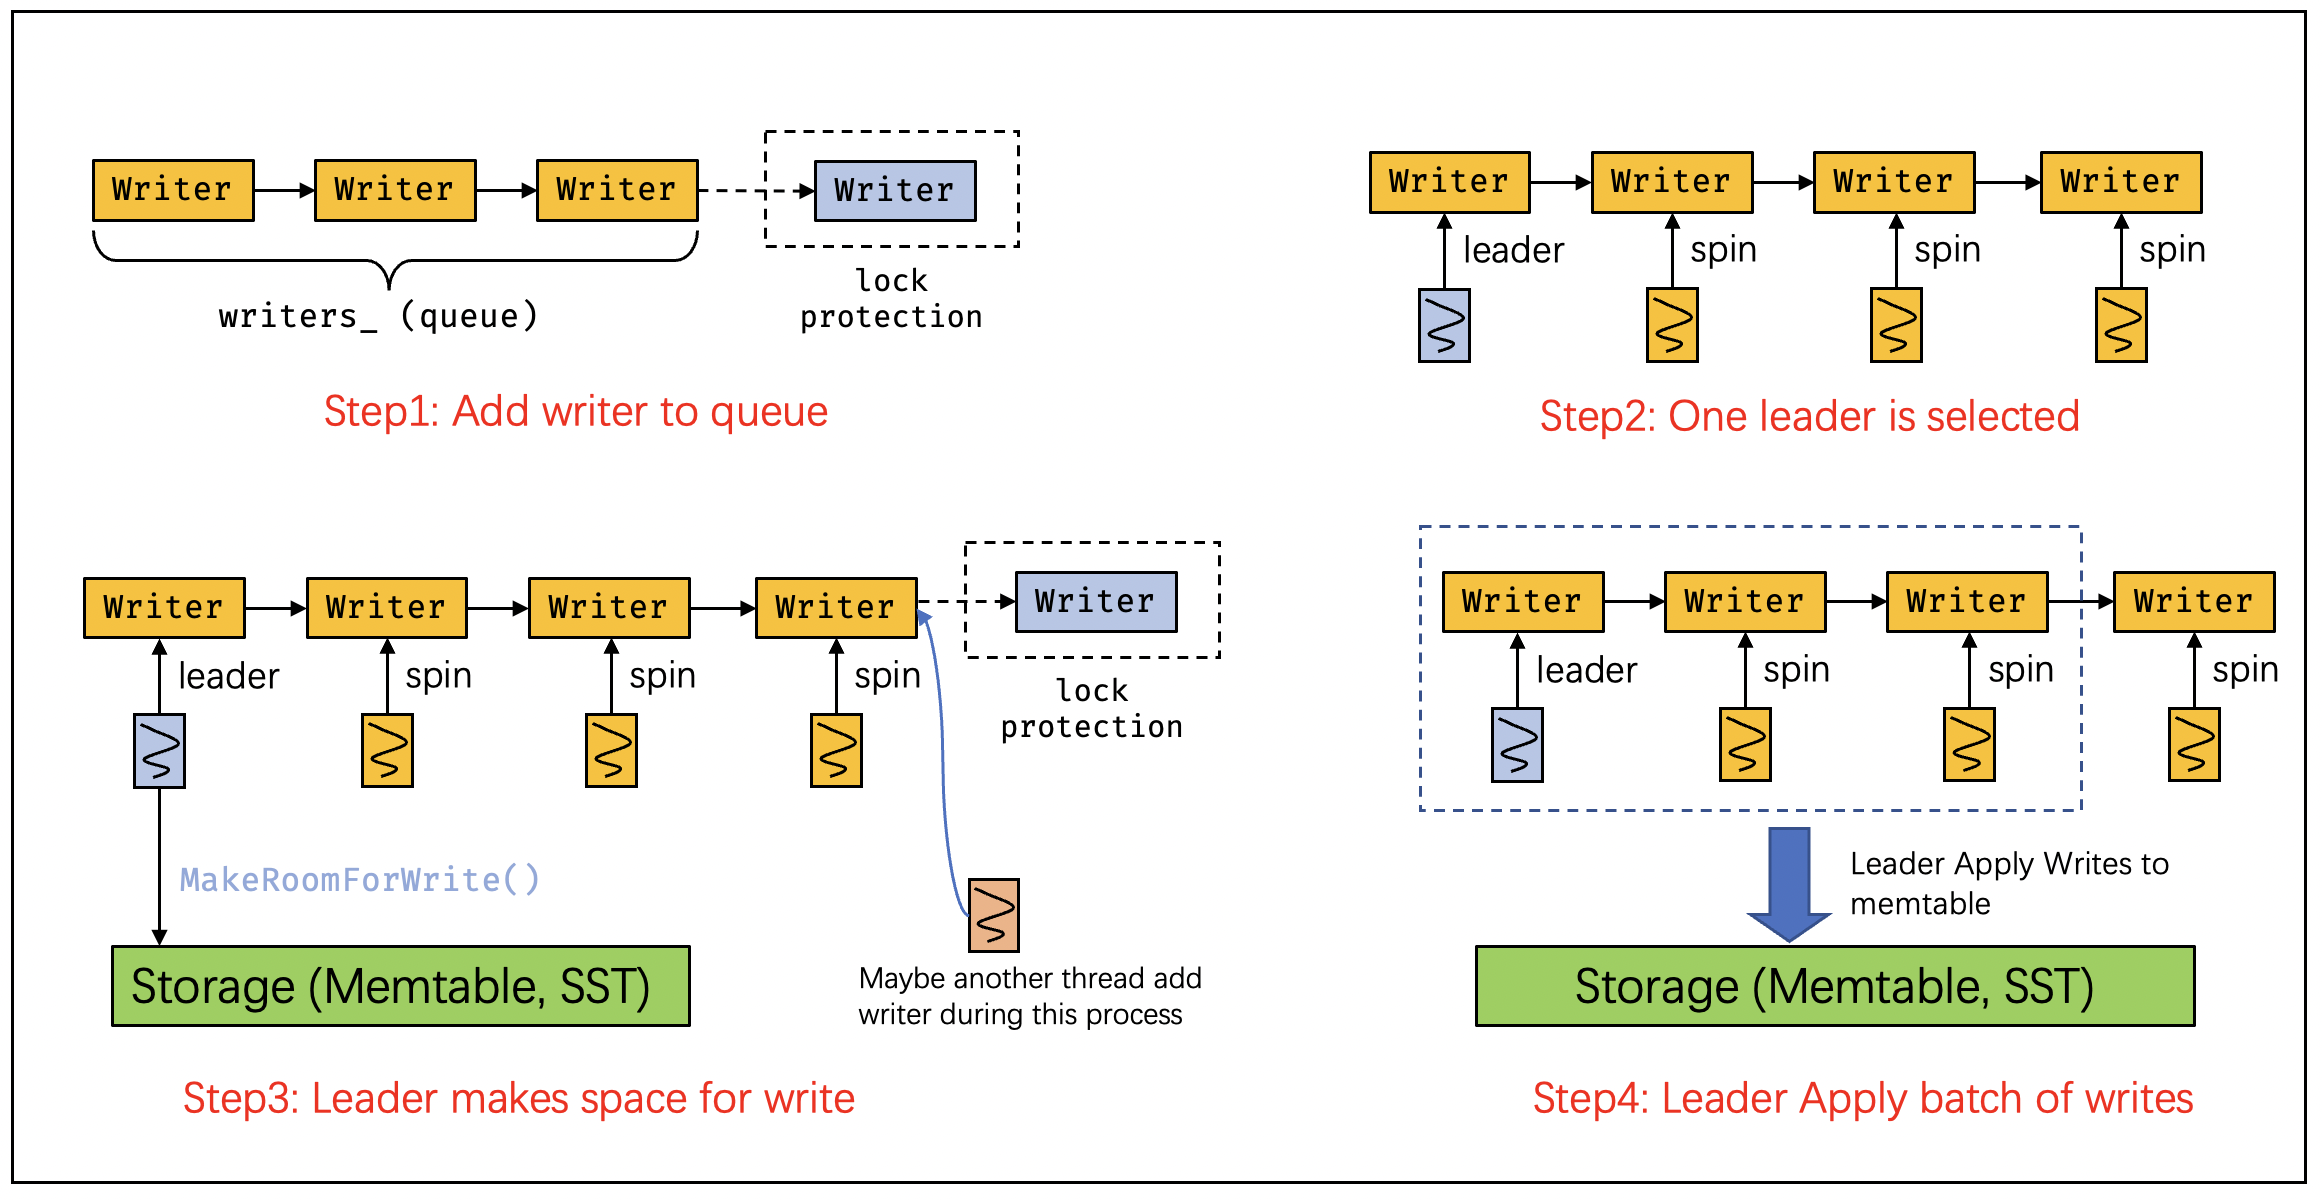
一共可以分为四个阶段,这四个阶段实际上也就代表了LevelDB的线程模型。我们对照代码和图来分析:
第一阶段:写操作将创建Writer并加入到Writer队列中:
这里,我们提到了Writer,它是一个定义在db_impl.cc文件中的结构,其名为Writer,但我更愿意称之为WriteRequest。其结构定义如下:
struct DBImpl::Writer {
  explicit Writer(port::Mutex* mu)
      : batch(nullptr), sync(false), done(false), cv(mu) {}

  Status status;
  WriteBatch* batch;
  bool sync;
  bool done;
  port::CondVar cv;
};从逻辑上理解,一个Writer(或request)值得是一次写请求,它包含了写必要的内容:要写入的数据:batch, 一个来自于WriteOption的选项:bool sync,以及一对用于同步的变量:bool done和CondVar cv。
当线程进行一次写操作时,它将要写的数据以及WriteOption设置到一个Writer上,然后结合条件变量自旋等待该写操作是否完成。这正是Write代码中所做的操作:
// Step1: Add writer(request) to queue
Writer w(&mutex_);
w.batch = updates;
w.sync = options.sync;
w.done = false;

MutexLock l(&mutex_);
writers_.push_back(&w);
while (!w.done && &w != writers_.front()) {
  w.cv.Wait();
}
第二阶段:选出Leader,非Leader的线程自旋等待对应的Writer操作完成
while (!w.done && &w != writers_.front()) {
  w.cv.Wait();
}
if (w.done) {
  return w.status;
}选出Leader(最近Raft看的有点多)的标准是该线程的Writer请求正好位于整个请求队列(writers_)的头部,满足此条件的线程会从上述while循环中离开,进行下一步操作,这也就意味着它已经成了leader,将执行后续的make room以及apply操作。
第三阶段:MakeRoom
Status status = MakeRoomForWrite(updates == nullptr);这一阶段直接调用MakeRoomForWrite函数为接下来要写入的请求分配足够的空间,整个过程会导致数据库内部的一系列变化,例如:immutable memtable的落盘,后台的compaction等等。最后的结果是active的memtable中应当有足够的位置来容纳接下来的batch write。
第四阶段:建立写入的batch并且apply到memtable中
(写到这里,我发现这四个阶段的划分并不合理,前三个干的事太少,而最后一个代码又太多;但是从逻辑上来看,最后一个阶段确实可以简单地用apply来概括。。。)
uint64_t last_sequence = versions_->LastSequence();
Writer* last_writer = &w;
if (status.ok() && updates != nullptr) {  // nullptr batch is for compactions
  // last_writer要写入的数据并不保存在write_batch中,也就是,它的数据在接下来的apply中并不会写入到
  // memtable中
  WriteBatch* write_batch = BuildBatchGroup(&last_writer);
  WriteBatchInternal::SetSequence(write_batch, last_sequence + 1);
  last_sequence += WriteBatchInternal::Count(write_batch);

  // Add to log and apply to memtable.  We can release the lock
  // during this phase since &w is currently responsible for logging
  // and protects against concurrent loggers and concurrent writes
  // into mem_.
  {
    mutex_.Unlock();
    // 将数据先写入logfile中,即WAL
    status = log_->AddRecord(WriteBatchInternal::Contents(write_batch));
    bool sync_error = false;
    if (status.ok() && W.sync) {	// 哦,原来WriteOptions中的sync指的是WAL的sync
      status = logfile_->Sync();
      if (!status.ok()) {
        sync_error = true;
      }
    }
    if (status.ok()) {
      status = WriteBatchInternal::InsertInto(write_batch, mem_);
    }
    mutex_.Lock();
    if (sync_error) {
      // The state of the log file is indeterminate: the log record we
      // just added may or may not show up when the DB is re-opened.
      // So we force the DB into a mode where all future writes fail.
      RecordBackgroundError(status);
    }
  }
  if (write_batch == tmp_batch_) tmp_batch_->Clear();

  versions_->SetLastSequence(last_sequence);
}
上述处理的逻辑不难理解,主要分为以下几个步骤:
- 基于当前已有的Write请求构建一个新的将被写入到memtable中的
WriteBatch, 这个过程通过调用BuildBatchGroup来完成,同时该处理函数会设置last_writer也就是最后一个被添加到这个batch中的Writer。因为BuildBatchGroup并不会将所有queue中的batch都添加进来,所以这里的目的是为了后面唤醒其他线程时知道界限。 - 然后
mutex_.Unlock, 并且将该write_batch中的所有内容写入到logfile_中,即WAL。这里解答了我之前的一个疑问,就是WriteOptions中的sync为true的含义,并不是指对应的写入要完全bypass memtable落盘,而是指这里的WAL是否要立刻落盘。可以想象,如果sync为true,导致logfile落盘,那么在Repair或Open时系统也会找回crash时的数据。 - 然后将这个batch内的所有记录都应用到memtable中:
status = WriteBatchInternal::InsertInto(write_batch, mem_);
tmp_batch在BuildBatchGroup中被使用,是一个类成员变量。
第五阶段:唤醒所有等待Writer写入的线程
while (true) {
  Writer* ready = writers_.front();
  writers_.pop_front();
  if (ready != &w) {	// 判断是不是leader,是的话就不能唤醒,否则导致死锁
    ready->status = status;	// 设置apply记录时的状态给上层
    ready->done = true;
    ready->cv.Signal(); // 设置done为true用于唤醒等待的线程
  }
  if (ready == last_writer) break;
}

// Notify new head of write queue
if (!writers_.empty()) {
  writers_.front()->cv.Signal();	// 找下一个leader
}
最后一步是唤醒所有等待的线程。
这里会将每一个写入的writer的status设置为在执行:WriteBatchInternal::InsertInto(write_batch, mem_)的返回值,大部分情况下这个值都会是Ok,但是InsertInto本身执行如果在中间某个步骤出现了错误,会导致提前返回错误码,从而也会导致这里在执行错误之后的所有writer都获得错误的status。这从逻辑上是很好理解的,对于一个正常运行的系统:一旦一个写入错误,之后的写入都不应该继续进行,因此应该返回错误码。
到此为止,我们几乎完全明白了leveldb的写入流程,除了几个调用的函数:MakeRoomForWrite, BuildBatchGroup以及与Version相关的几个操作。其中MakeRoomForWrite是一个非常核心的部分,我们会在后面重点关照它。
到这里,我们终于可以给出一张用于说明LevelDB写入过程的图,其来源我已经记不清楚了,只记得当时是顺手保存的:

DBImpl读流程:Get
LevelDB的读操作流程相比之下比较简单,根据设计:LevelDB在读时会以memetable-> immutable memtable->files的过程进行读取,直到其中某个步骤完成读取为止:
{
  mutex_.Unlock();
  // First look in the memtable, then in the immutable memtable (if any).
  LookupKey lkey(key, snapshot);
  if (mem->Get(lkey, value, &s)) {
    // Done
  } else if (imm != nullptr && imm->Get(lkey, value, &s)) {
    // Done
  } else {
    s = current->Get(options, lkey, value, &stats);
    have_stat_update = true;
  }
  mutex_.Lock();
}
其中current是一个Version结构体,可以认为它类似于一个记录全局元数据的数据结构,因此同样也对多个SSTFile进行管理,因此可以通过它对所有SST文件进行搜索。
除此之外,Get还有一些诸如对memtable和immtable进行引用和解引用的操作,这里不再说明,一方面是因为我们还不明确Ref的作用,另一方面它们对主要逻辑确实无足轻重。
其他相关函数
BuildBatchGroup
在DBImpl::Write中的一个步骤是创建一个用于写入的WriteBatch,按照逻辑,这个Batch不能太大,并且也不能包含WriteOptions完全不同的多个写入。这正是BuildBatchGroup的逻辑:
WriteBatch* DBImpl::BuildBatchGroup(Writer** last_writer) {
  mutex_.AssertHeld();
  assert(!writers_.empty());
  Writer* first = writers_.front();
  WriteBatch* result = first->batch;
  assert(result != nullptr);

  size_t size = WriteBatchInternal::ByteSize(first->batch);

  // Allow the group to grow up to a maximum size, but if the
  // original write is small, limit the growth so we do not slow
  // down the small write too much.
  size_t max_size = 1 << 20;
  if (size <= (128 << 10)) {
    max_size = size + (128 << 10);
  }
  ...
}上述代码中,首先进行一系列的判断,然后将迭代所有Writer Queue中的Writer来创建写入batch,在这之前,先设置遍历的起始位置:Writer* first = writers_.front();,然后是设定这个batch能容纳的数据大小:max_size。这里的判断逻辑首先设定起始大小为1MB(1 << 20), 然后通过判断第一个batch的大小是否小于128K来决定是否扩容这个max_size。这里的逻辑让我有点疑惑,注释说这样是为了让小的写入不被拖慢。
size记录了该batch当前的大小,因为first的batch必须被添加到write_batch中,所以其被初始化为first->batch的size。
接下来是遍历WriterQueue中的元素并添加到写入的batch中,直到size超出前面的限制为止。这里添加的粒度是一个Writer的Batch,而不是一条记录:
*last_writer = first;
std::deque<Writer*>::iterator iter = writers_.begin();
++iter;  // Advance past "first"
for (; iter != writers_.end(); ++iter) {
  Writer* w = *iter;
  if (w->sync && !first->sync) {
    // Do not include a sync write into a batch handled by a non-sync write.
    break;
  }

  if (w->batch != nullptr) {
    size += WriteBatchInternal::ByteSize(w->batch);
    if (size > max_size) {
      // Do not make batch too big
      break;
    }

    // Append to *result
    if (result == first->batch) {
      // Switch to temporary batch instead of disturbing caller's batch
      result = tmp_batch_;
      assert(WriteBatchInternal::Count(result) == 0);
      WriteBatchInternal::Append(result, first->batch);
    }
    WriteBatchInternal::Append(result, w->batch);
  }
  *last_writer = w;
}
第一个值得注意的地方在第六行的判断:不同WriteOptions的写入绝不能放在一个Batch中。但问题是,为什么不写成:
if (w->sync != first->sync)也就是说,如果
first->sync是true,而w->sync是false的话,也能加入到这个batch中。这是因为仔细阅读DBImpl::Write的逻辑会发现,在batch写入WAL之后,判断是否要sync的依据是options.sync,实际上也就是此处的first->sync。因此,如果w->sync==false && first->sync==true实际上是在说我们对后面的写入进行了一次不必要的persist,但正确性上没有问题。该循环会在
size > max_size时退出,说明write_batch的大小已经超过了限制。- 第二个要注意的地方是19行开始的判断,这个判断第一次执行一定为true,因为
result在初始化时就被设置为了first->batch,除非在执行这里的判断之前就break出了循环。这里执行的是将result切换到tmpbatch,并且将first->batch的数据写到其中。也就是说,如果最后生成的result中只有first->batch(提前break了),那么result就是first->batch;否则就用类自带的tmp_batch。- 根据注释,
first->batch不能被破坏(因为其本质上是用户传进来的参数),所以也就不能在append的情况下用first->batch作为返回值,因此需要切换到tmp_batch来存储。 - 如果是我,我会固定用
tmp_batch做返回值,而不是做这么复杂的判断。作者是想省略一次拷贝first->batch的开销吗?
- 根据注释,
- 最后一定一定要更新
last_writer